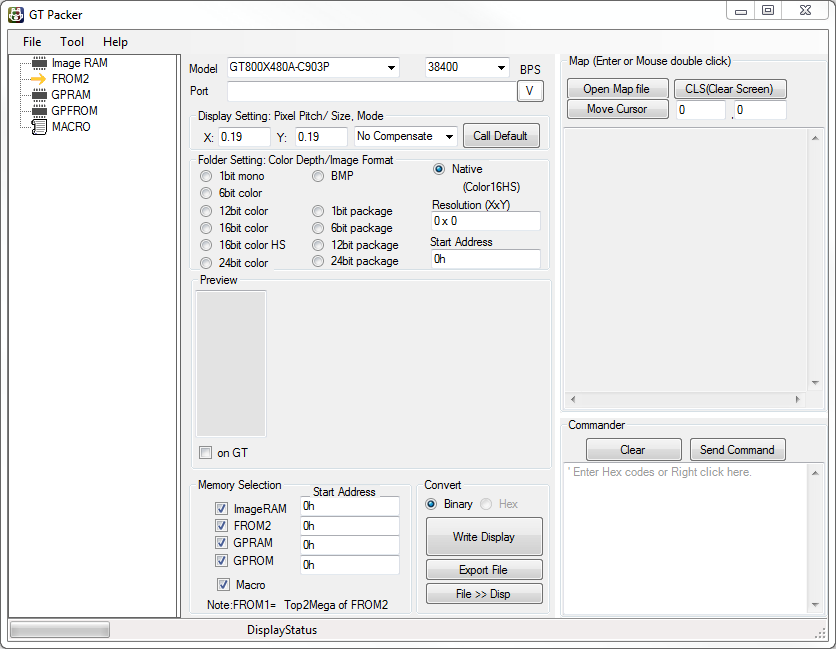
GT Packer Provides the easiest way to display, store, and manage images on your GU-TFT(GT-CP) module.

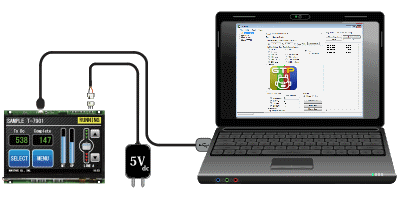
This tool provides a quick and easy way to evaluate our GU-TFT(GT-CP) module via USB or UART. This application allows you to display images on the GU-TFT(GT-CP) modules. Choose from either USB or UART to communicate with any of our GU-TFT(GT-CP) displays.
Note: This tool is deprecated. The GT Packer merged into the memory tool of GTOMP. Please use GTOMP.
Download
Update: 10-04-2018
System Requirements:
- Microsoft Windows 7/8 (32bit/64bit) with .NET framework 4.0 or 4.5
- Serial Communication Port (USB / UART)
- 4MB of Hard Drive space
Application Setup:
- Unzip the downloaded file into a folder that you wish to keep your GT Packer. It is recommended to keep it in a new folder to avoid confusion with your existing files. You should now have the GT Packer execution file, WinUSB installer for Windows 7 and GT Packer quick start guide.
- The USB communication driver needs to be installed next. If you are using Windows 8.1/10, please skip forward to step 3. If you are using Window 7, please continue to the next step.
- Unzip WinUSBdriverForWin7.zip.
- Connect your GT-CP module to your PC via USB.
- If you have not installed WinUSB or a Noritake virtual COM port driver before, the driver installation will fail. When it does, go to your PC’s Device Manager.
- Right click on “GT800X480A-C903PA” and choose “Update Driver Software”.
- Click on “Browse my computer for driver software”.
- Click “Browse” and navigate to WinUSBdriverForWin7/winusbcompat.
- Click on “Next”.
- The driver should install and finish by saying that the “WinUSB Device” driver has been installed.
* WinUSB is already packaged with Windows 8.1/10 so only install it on Windows 7.
* If you don’t want to use WinUSB or if you encounter an error during installation, install our GU-TFT driver from this page.
- Connect your GU-TFT(GT-CP) module to your PC via USB.
- Launch the GTPackerXXXX.exe file. The main GT Packer window should appear.
- You can now use this tool to evaluate your Noritake GU-TFT(GT-CP).
Conditions:
Applicable Display Models:
Tested operating systems:
- Microsoft Windows 7/8 (32bit/64bit) with .NET framework 4.0 or 4.5
Revision History:
| Version | Date | Revision |
|---|---|---|
| 0.8.2.3 | 9-18-2017 | Initial |
| 0.8.2.4 | 10-27-2017 | Minor Bugs Fixed |
| 0.8.5.6 | 07-16-2018 | – Added macro and Commander – Minor bugs fixed |
| 0.8.8.3 | 10-04-2018 | -Bug fixes – Added memory switch editor – Added the ability to change image resolution – Added additional functionality to Commander -Added touch setting package data functions |
Note:
- This tool is supplied “As is” without any warranty.
- Its possible to fail or malfunction under a specific combination of peripherals and PC or operating system.
- When using “bus-powered” mode, please verify the GU-TFT module’s power consumption with the module’s hardware specification.
- Power requirements are reported as “bus-powered” 100mA. Please check that the USB host/hub is capable of providing sufficient power. When using “bus-powered” mode, please verify the GU-TFT module’s power consumption with the module’s hardware specification.
Display a bitmap image on your GU-TFT(GT-CP):
- With your GU-TFT module connected to your PC and GT Packer open, select the serial port that your module is connected to or select Noritake Display if you are using WinUSB.
- Once the connection is successful, navigate to the image that you would like to display in Windows Explorer.
- Drag and drop the image to the FROM2 node on the left of the GT Packer window.
- NOTE: The recommended image side is 800 x 480 pixels (or 480 x 272 pixels). Image processing time increases as image resolution increases.
- A new node will appear underneath the FROM2 node. Click this new node.
- The image will then load into the “Preview” section of the application.
- Once the image has appeared in the “Preview” section, click on the checkbox next to “on GT”.
- The image will now be displayed on the module.
Screenshots: