GTO TOOL Provides the GUI to evaluate and customize your GT-CP module.

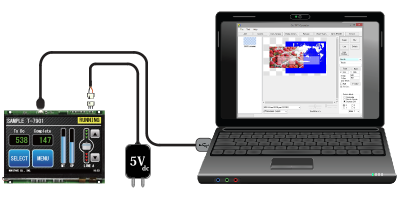
This tool provides a quick and easy way to evaluate our GU-TFT(GT-CP) module via USB or UART. It allows you to explore all of the features unique to the GT-CP module like full color images and observing coordinate touch data. Choose from either the generic WinUSB driver on Windows 7/8.1/10 or our own driver software when using USB communication.
Note: This tool is deprecated. The GTO TOOL merged into the design tool of GTOMP. Please use the GTOMP.
Download
Update: 09-14-2017
System Requirements:
- Microsoft Windows 7(32bit/64bit)/8/10 with .NET framework 4.0 or 4.5
- Serial Communication Port (USB / UART)
- 4MB of Hard Drive space
Application Setup:
- Unzip the downloaded file into a folder that you wish to keep your GTO Tool. It is recommended to keep it in a new folder to avoid confusion with your existing files. You should now have the GTO Tool execution file, WinUSB installer for Windows 7 and GTO instruction documents.
- The USB communication driver needs to be installed next. If you are using Windows 8.1/10, please skip forward to step 3. If you are using Window 7, please continue to the next step.
- Unzip WinUSBdriverForWin7.zip.
- Connect your GT-CP module to your PC via USB.
- If you have not installed WinUSB or a Noritake virtual COM port driver before, the driver installation will fail. When it does, go to your PC’s Device Manager.
- Right click on “GT800X480A-C903PA” and choose “Update Driver Software”.
- Click on “Browse my computer for driver software”
- Click “Browse” and navigate to WinUSBdriverForWin7/winusbcompat
- Click on “Next”
- The driver should install and finish by saying that the “WinUSB Device” driver has been installed.
* WinUSB is already packaged with Windows 8.1/10 so only install it on Windows 7.
* If you don’t want to use WinUSB or if you encounter an error during installation, install our GU-TFT driver from this page.
- Connect your GU-TFT module to your PC via USB.
- Launch the GTOXXXX.exe file. The main GUTFT Operator Tool window should appear.
- You can now use this tool to evaluate your Noritake GU-TFT.
Conditions:
Applicable Display Models:
- GT800X480A-C903P
- GT800X480A-C903PA
Tested operating systems:
- Microsoft Windows 7/8.1/10 (32bit/64bit) with .NET framework 4.0 or 4.5
Revision History:
| Version | Date | Revision |
|---|---|---|
| 0.7.2.0 | 10-27-2016 | Initial |
| 0.8.1.2 | 09-14-2017 | Added new features; – Generating Arduino Sample Code – Generating Touch-Event Code |
Note:
- This tool is supplied “As is” without any warranty.
- Its possible to fail or malfunction under a specific combination of peripherals and PC or operating system.
- When using “bus-powered” mode, please verify the GU-TFT module’s power consumption with the module’s hardware specification.
- Power requirements are reported as “bus-powered” 100mA. Please check that the USB host/hub is capable of providing sufficient power. When using “bus-powered” mode, please verify the GU-TFT module’s power consumption with the module’s hardware specification.
Display “Hello” on your GU-TFT:
- With your GU-TFT module connected to your PC and GTO Tool open, select the virtual COM port that your module is connected to or choose WinUSB if you are using the generic WinUSB driver.
- Once the connection is successful, click on the “User Window” button.
- Move over to the editing window and left-click and drag a “User Window” box within the checkered area.
- Once you release your left mouse button, a dialog box will pop-up and ask you to choose a color. This color will correspond with the color of the “Hello World” text.
- Once you have chosen a color, click “OK” and another dialog box will pop-up and ask you to enter a string. Type “Hello World” into the text box and click “OK”.
- You will now see “Hello World” on you screen’s design in the color that you chose.
- Now, click on the “Preview” button to send your current screen design to your connected module.
- You should now see “Hello World” on your display.
Display an image on your GU-TFT:
- With your GU-TFT module connected to your PC and GTO Tool open, select the virtual COM port that your module is connected to or choose WinUSB if you are using the generic WinUSB driver.
- Once the connection is successful, click on the “Image” button.
- Move over to the editing window and left-click and drag an “Image” box within the checkered area. The size of your image can be adjusted later.
- Once you release your left mouse button, a dialog box will pop-up and ask you to choose an image from your computer.
- Once you have chosen an image, click “OK” and the image will appear on your screen’s design.
- If you are unhappy with the position or size of the image, you can:
- Reposition the image by clicking and dragging the image or by changing its X and Y coordinates in the “Properties Window”.
- Resize the image by clicking and dragging the edges of the image or by changing its width and height values in the “Properties Window”.
- Once you are happy with your image, click on the “Preview” button to send your current screen design to your connected module.
- You should now see the image on your display.
Tutorial Video: GU-TFT Screen Design with GTO Tool
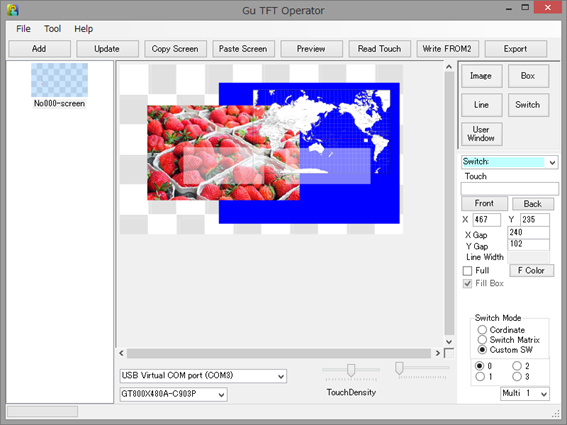
Screenshots: