Series: Using the GT-SP Touch Panel TFT Display with Arduino
Controlling an LED Connected to Arduino from a Touch Screen

Table of Contents
DownloadDownload sample project & program (for GT Design Studio & Arduino)
Hello everyone, I’m @kissaten, someone interested in trying out electronics projects. In this series, I, as a beginner in electronics, will explain the process of connecting a touch panel TFT/LCD display to Arduino and developing various things. The touch screen used is Noritake’s 7-inch touch display GT-SP series, “GTWV070S3A00P.”
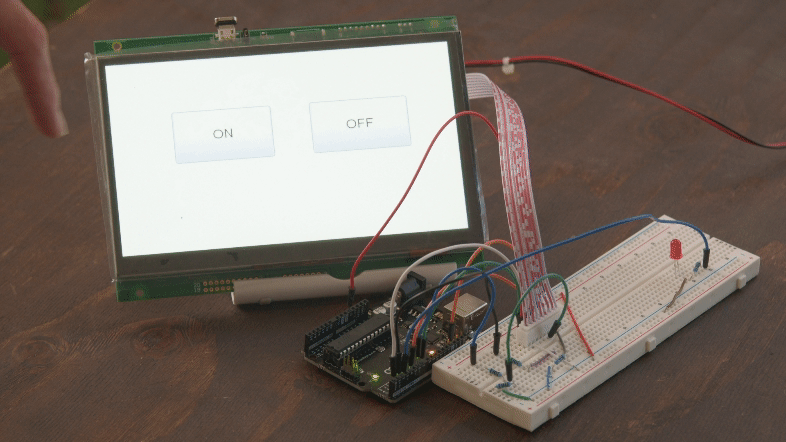
In this installment, we will operate an LED connected to Arduino from the touch screen.
This article is a continuation of the previous one (“Connecting Arduino and Touch Screen to Display Text”). If you haven’t read the previous article yet, you can check it out here.
Adding Arduino and LED Connection
This time, as we want to control an LED from the touch screen, we’ll add an LED and a resistor to the circuit from the previous article, as shown in the diagram below. Specifically, connect “D2 – Resistor (1K ohm) – LED – GND.” Pay attention to the polarity of the LED. (Wiring between GT-SP and Arduino is omitted. If you want to check, please refer to the previous article.)
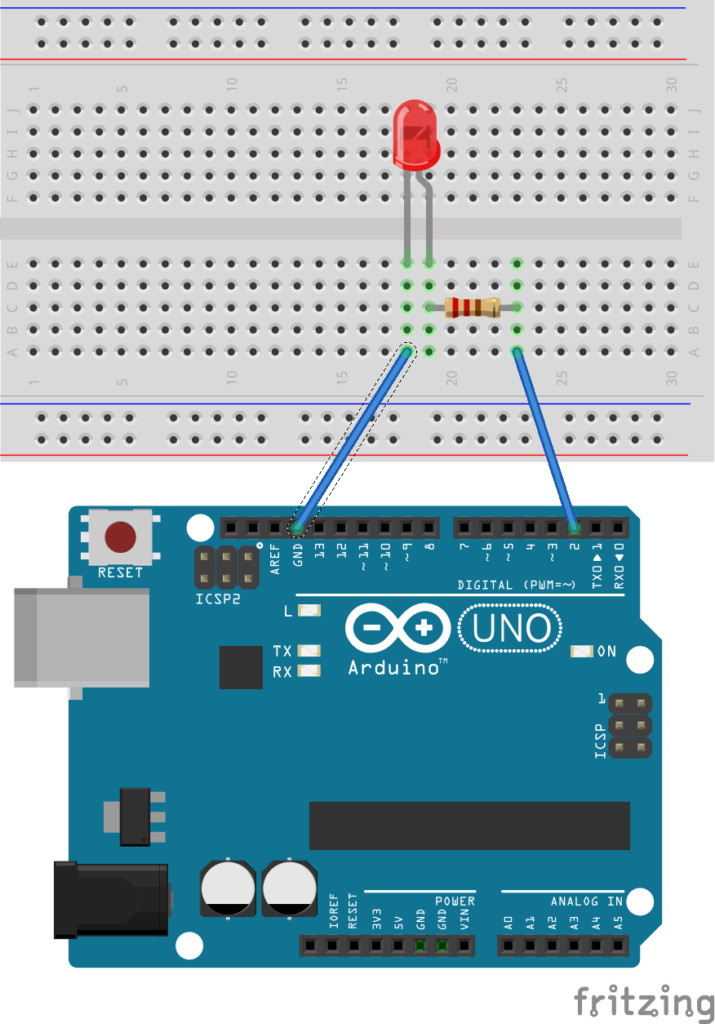
Picture by [Fritzing (CC BY-SA)]
Creating a Project to Write to the Touch Screen
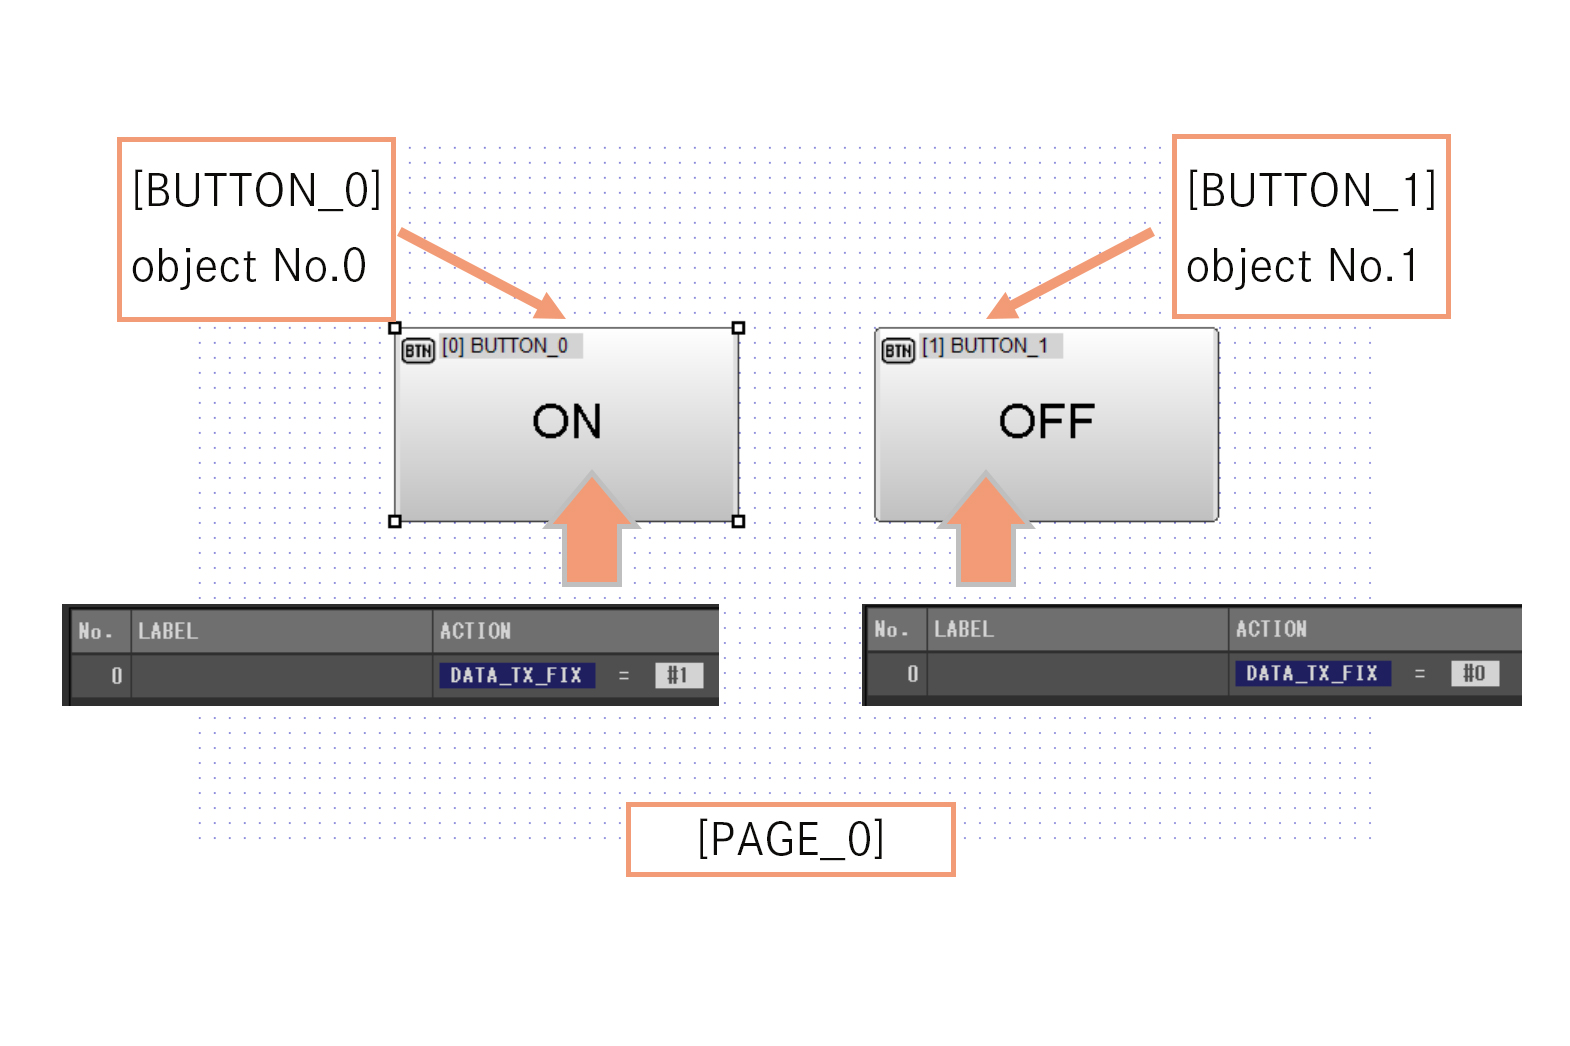
Using GT Design Studio, create a project where pressing buttons turns the LED on or off. For clarity, this time, register two buttons, ON and OFF, on the GT-SP.
Explanation
Create buttons “BUTTON_0” and “BUTTON_1” on page “PAGE_0” and assign the event action “DATA_TX_FIX” to each. In the content, use NUMBER to input “1” (ON) for one button and “0” (OFF) for the other.
Now, when the GT-SP buttons are pressed, a project has been created to send the values “1” or “0” to Arduino.
Creating a Program to Upload to Arduino
The program created for this occasion is as follows.
DownloadDownload sample project & program (for GT Design Studio & Arduino)
|
1 2 3 4 5 6 7 8 9 10 11 12 13 14 15 16 17 18 19 20 21 22 23 24 25 26 27 28 29 30 31 32 33 34 35 36 37 38 39 40 41 42 43 44 45 46 47 48 49 50 51 52 53 54 55 56 57 58 59 60 61 62 63 64 65 66 67 68 69 70 71 72 73 |
#include <string.h> //ピン接続 | Pin assign #define GT_DTR 4 //DTR #define GT_DSR 6 //DSR #define GT_TRDY 7 //TRDY <--未使用 | unused in this sample #define LED_PIN 2 //LED void setup() { //ピン初期設定 | Pin setting pinMode(GT_DTR, INPUT); pinMode(GT_DSR, OUTPUT); pinMode(GT_TRDY, INPUT); pinMode(LED_PIN, OUTPUT); // D2ピンを出力に設定 | Output D2 pin digitalWrite(GT_DSR, LOW); //Serial setting Serial.begin(38400); //38400bps Baud rate Serial.setTimeout(100); //シリアルタイムアウト | Serial timeout } //変数 | Variable int gtsp_res_data_val; bool screen_reflesh = false; //画面再描画フラグ | Display refresh flag //////////////////////////////////////////////////// // loop //////////////////////////////////////////////////// void loop() { if ( Serial.available() ) { gtsp_res_data_val = gtsp_signal_read_val(); screen_reflesh = true; Serial.println(gtsp_res_data_val); if(gtsp_res_data_val == 1){ // 受信した値が1だった場合 | If the value received is 1 digitalWrite(LED_PIN, HIGH); // LEDを点灯 | Turn on LED Serial.print("CMD"); //コマンドヘッダ | Command header Serial.write(0x58); //輝度設定 | Brightness setting Serial.write(0xFF); //輝度50% | Brightness 50% } if(gtsp_res_data_val == 0){ // 受信した値が0だった場合 | If the value received is 0 digitalWrite(LED_PIN, LOW); // LEDを消灯 | Turn off LED Serial.print("CMD"); //コマンドヘッダ | Command header Serial.write(0x58); //輝度設定 | Brightness setting Serial.write(0x80); //輝度50% | Brightness 50% } } } /********************** 関数 | Function **********************/ //////////////////////////////////////////////////// // データ受信(数値用) | Receive data from GT-SP (for Value) // (バイト長4バイトまで | Byte length is up to 4 byte) //////////////////////////////////////////////////// unsigned long gtsp_signal_read_val(){ byte res_dl[4] = ""; unsigned long dl; byte res_val[4] = ""; unsigned long val; if (Serial.find("RESb", 4)){ Serial.readBytes(res_dl, 4); //データ長抽出 | Read data length dl = (unsigned long)(res_dl[0] + (res_dl[1]<<8) + (res_dl[2]<<16) + (res_dl[3]<<24)); //データ長変換 | Data length Serial.readBytes(res_val, dl); //データ抽出 | Read data val = (unsigned long)(res_val[0] + (res_val[1]<<8) + (res_val[2]<<16) + (res_val[3]<<24)); //データ抽出 | Read data return val; //リターン | Return } } |
Interpreting the Program
GT-SP’s buttons, when pressed, send the numerical values “1” or “0” to Arduino. Arduino reads this data and turns the LED on if the value is “1” and off if it’s “0.”
In detail, first, the LED pin is assigned as “LED_PIN,” assuming it’s connected to pin D2. When the host receives serial data from GT-SP, the function gtsp_signal_read_val() is called, returning the numeric data “1” or “0” sent from GT-SP. In the subsequent if statement, if the received value is “1,” it sets “LED_PIN” to “HIGH” to turn on the LED; if it’s “0,” it sets it to “LOW” to turn off the LED.
Execution Result
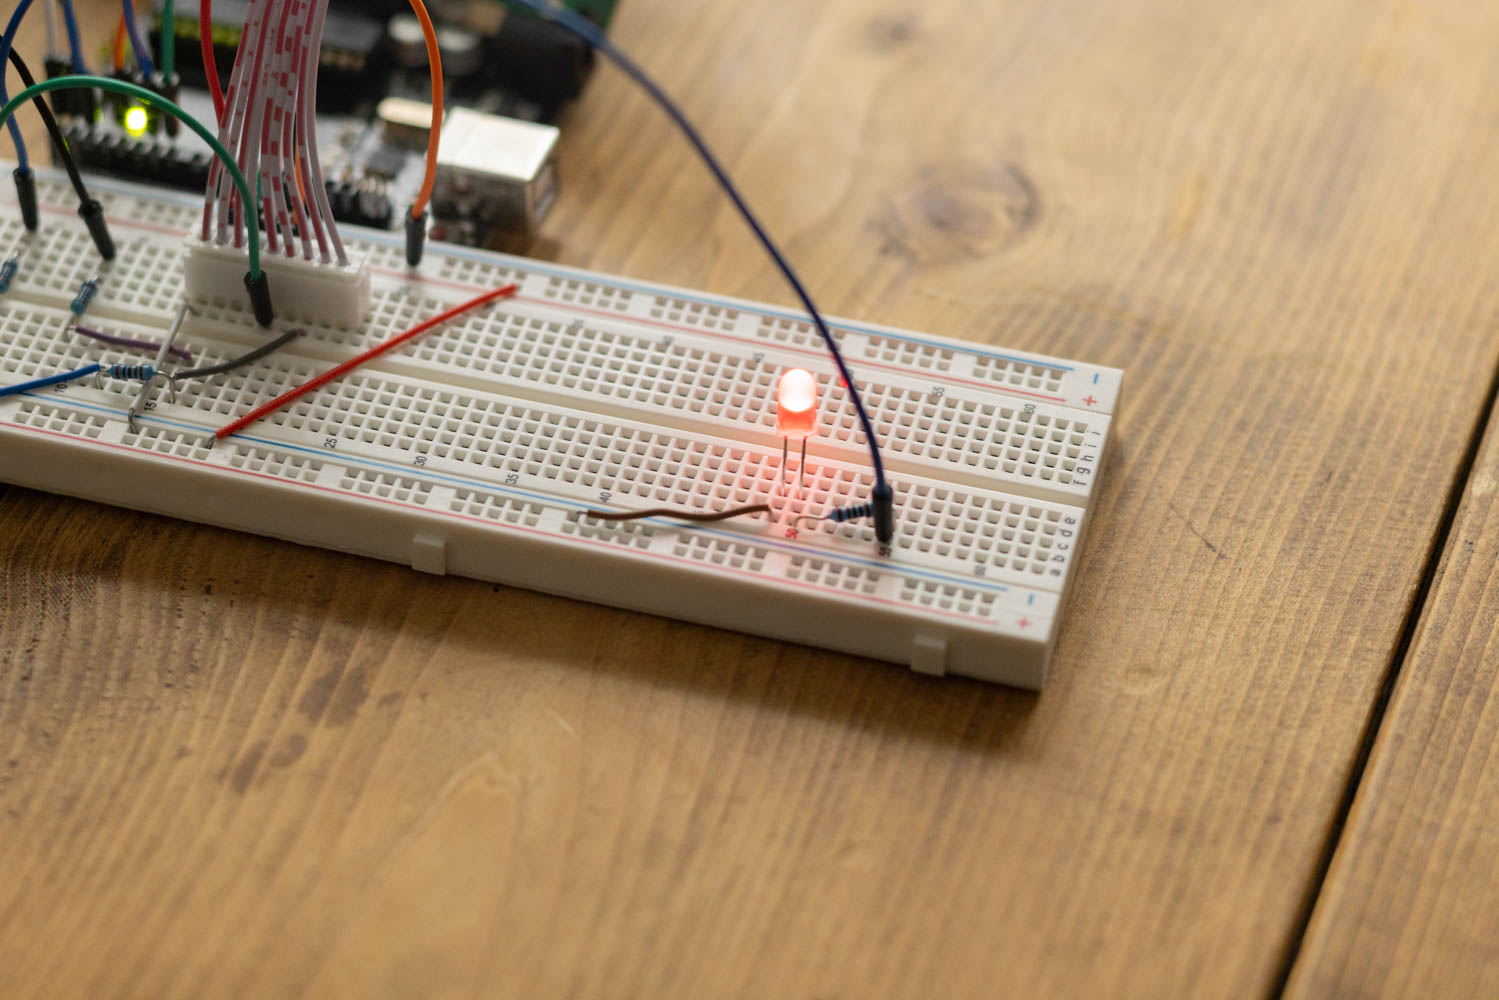
Pressing “BUTTON_0” (ON button) on GT-SP lights up the LED connected to Arduino, and pressing “BUTTON_1” (OFF button) turns it off. This confirms that the program uploaded to Arduino is working correctly. Additionally, checking the operation in the terminals of both GT-SP and Arduino confirms the proper communication.
In the next session, we’ll display the values from a sensor connected to Arduino on the GT-SP.