Series: Using the GT-SP Touch Panel TFT Display with Arduino
Creating an Intuitive UI with an Ultrasonic Sensor: Switching GT-SP Images Based on Distance

Table of Contents
DownloadDownload sample project & program (for GT Design Studio & Arduino)
Hello everyone, I’m @kissaten, a beginner in electronics. In this series, I’m explaining the process of connecting a 7-inch touch display (GT-SP series “GTWV070S3A00P”) to an Arduino and working on various projects.
This time, we will use a standard ultrasonic sensor to measure the distance to an object and create an intuitive UI that switches the GT-SP screen based on that distance. By incorporating a mechanism where graphics change in stages according to the distance, rather than just displaying fluctuating numbers, you can build a more practical interface.
Overview of This Project
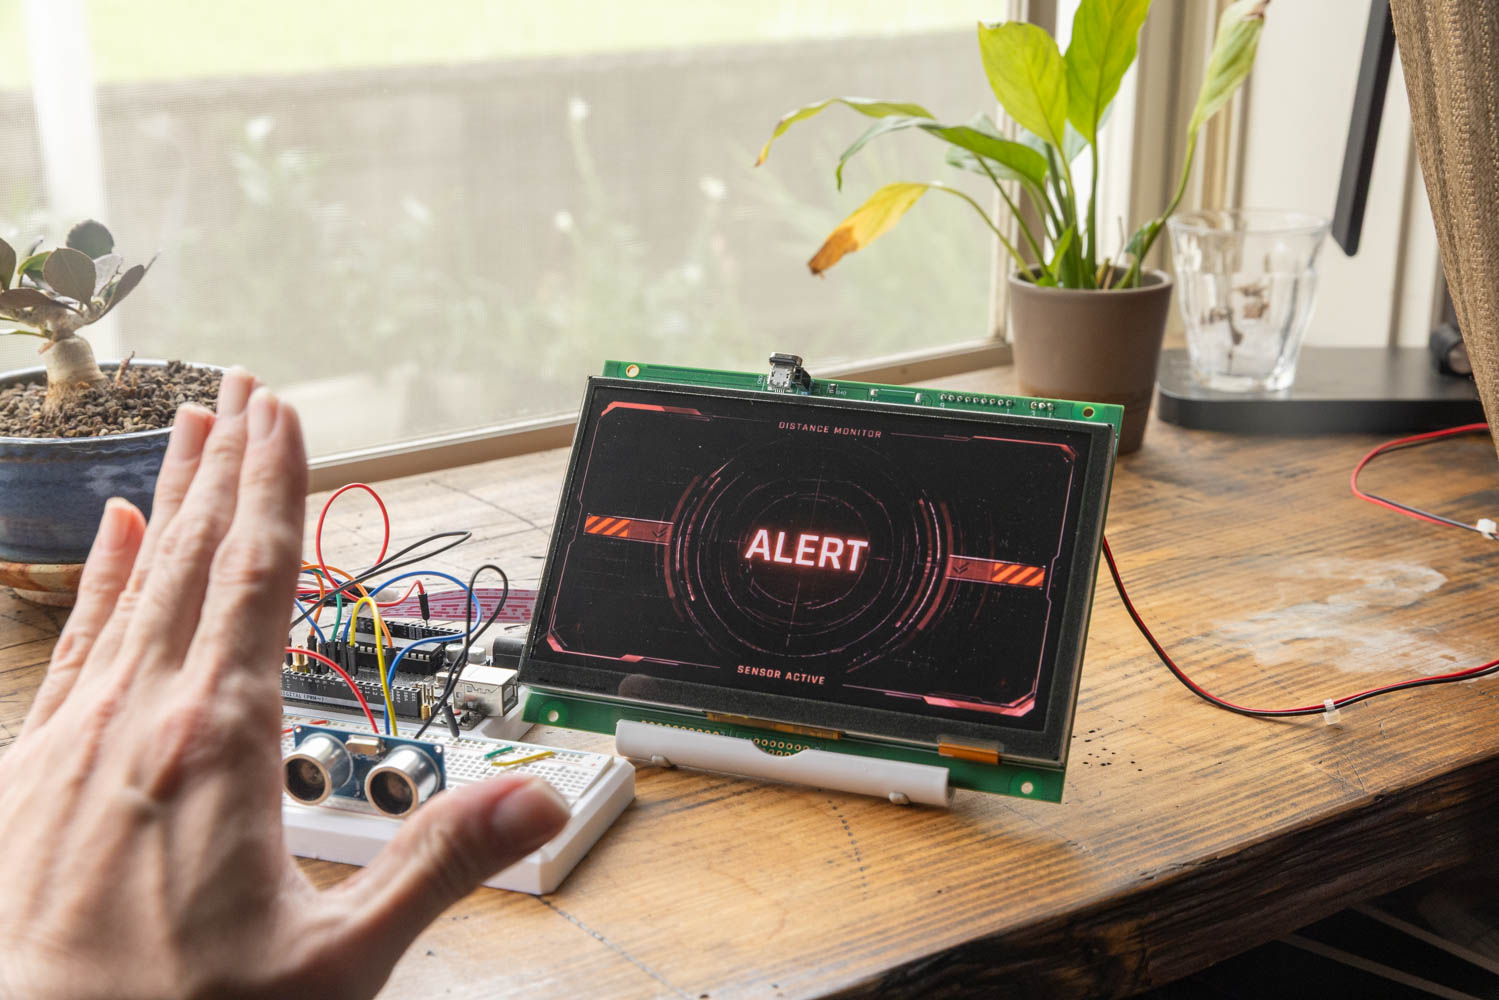
In this project, we will create a mechanism that switches the image object on the screen in three stages depending on the distance when a hand is held in front of the sensor. Since the screen responds to the movement of a hand moving closer or further away, it can be utilized for applications that provide visual feedback on the operation status without physical contact.
Ultrasonic Sensor Wiring
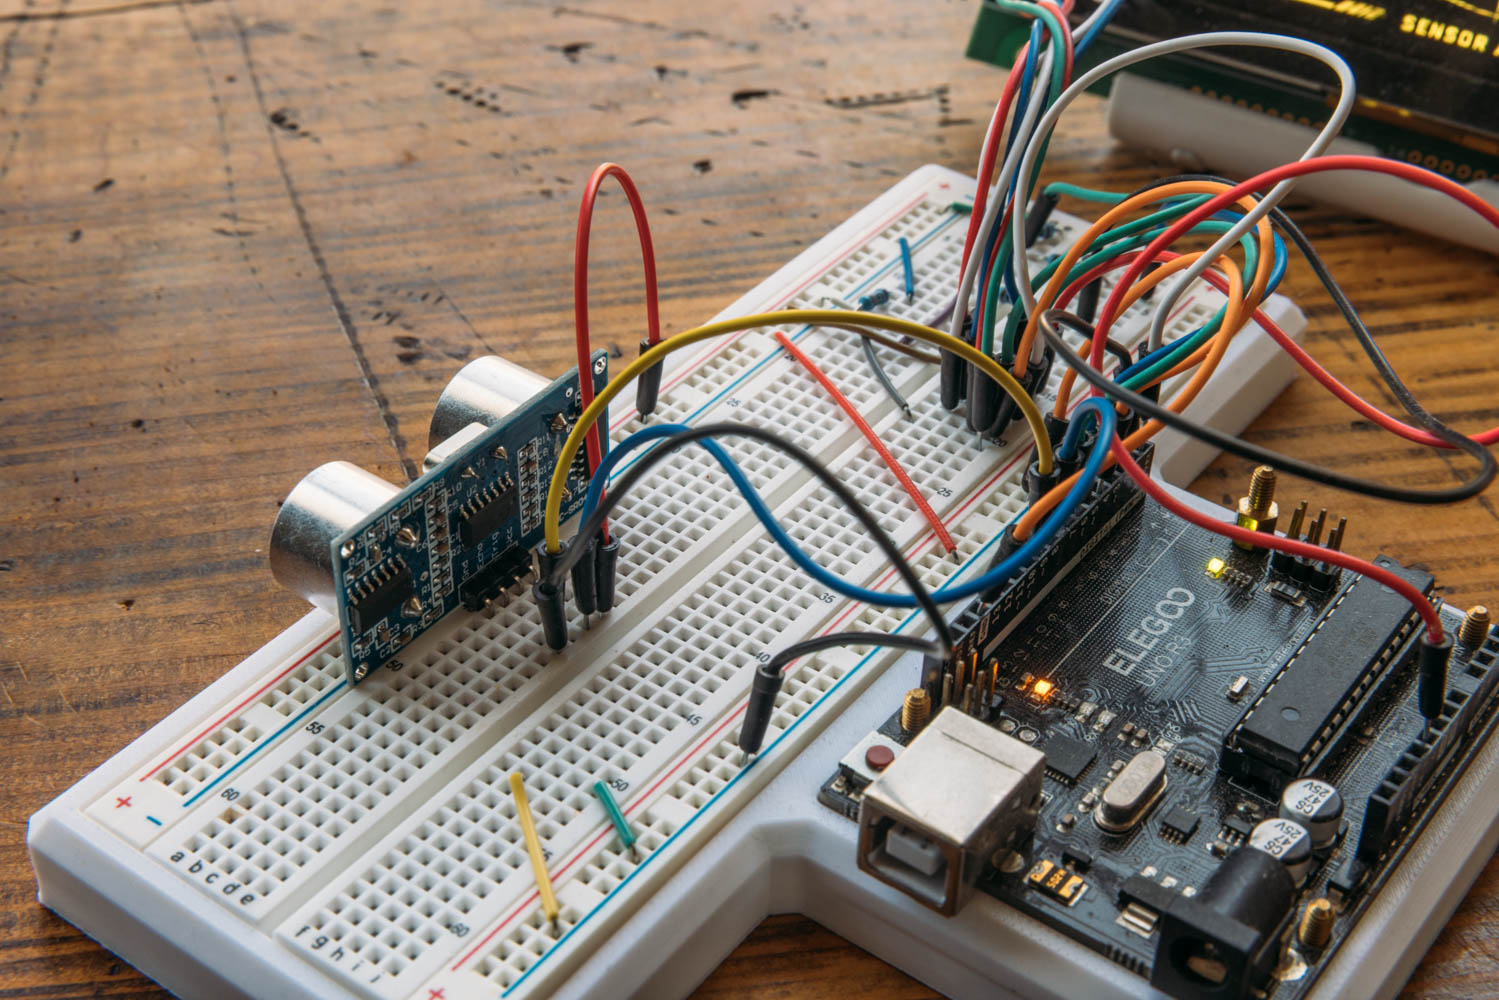
The ultrasonic sensor has 4 pins. We will connect these to the Arduino using jumper wires. The wiring is as follows:
- VCC pin: To Arduino 5V
- GND pin: To Arduino GND
- Trig pin: To Arduino pin 8
- Echo pin: To Arduino pin 9
First, we will organize the wiring on a breadboard to verify the operation.
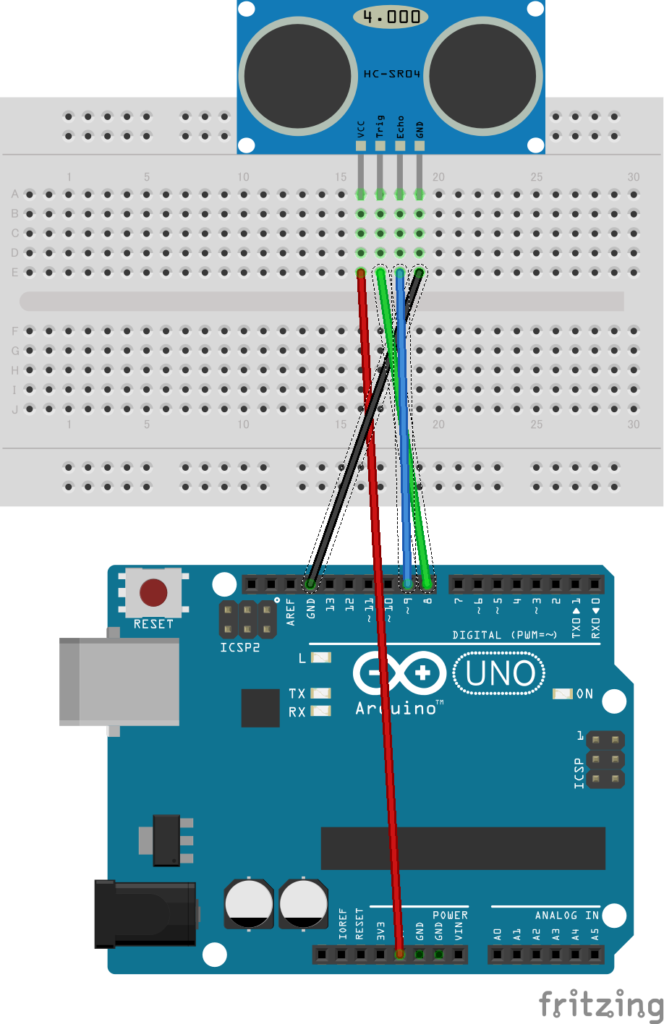
Picture by [Fritzing (CC BY-SA)]
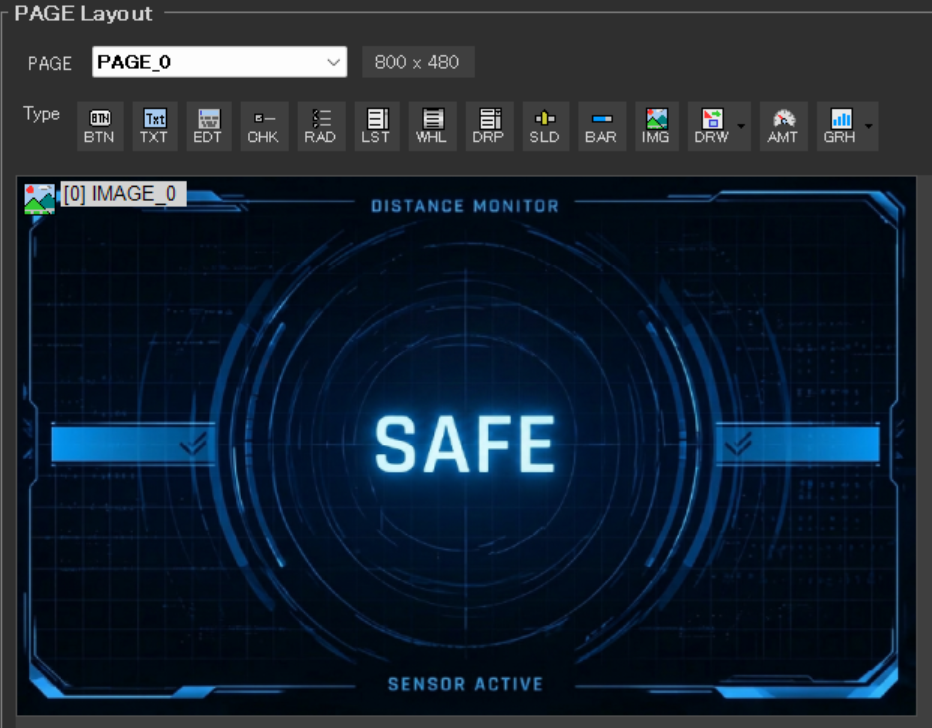
Screen Creation in GT Design Studio
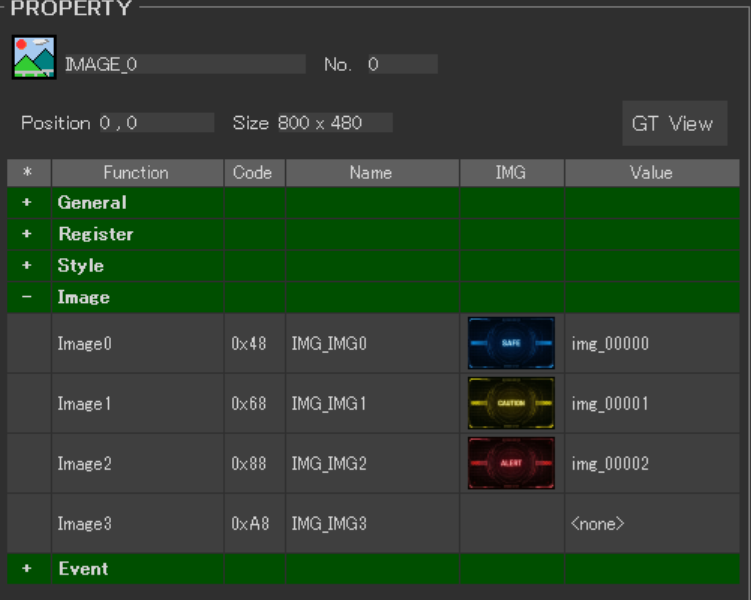
Open GT Design Studio and place an image object. Set this object No. to “0”.
Then, register 3 images corresponding to the distance in the “Image” property.
- Image0: Far (25cm or more)
- Image1: Medium (12cm to less than 25cm)
- Image2: Near (less than 12cm)
Program to Write to Arduino
The sensor calculates the distance, assigns a numerical value of 0, 1, or 2 based on the result, and sends it to the GT-SP image object. The key point here is that the program is designed to send a command only when the value changes, which reduces the communication load on the display side.
If you actually open the Serial Monitor in the Arduino IDE, you can confirm that data is transmitted only at the moment the distance evaluation changes. Incorporating such minor optimizations leads to stable operation of the entire system.
DownloadDownload sample project & program (for GT Design Studio & Arduino)
|
1 2 3 4 5 6 7 8 9 10 11 12 13 14 15 16 17 18 19 20 21 22 23 24 25 26 27 28 29 30 31 32 33 34 35 36 37 38 39 40 41 42 43 44 45 46 47 48 49 50 51 52 53 54 55 56 57 58 59 60 61 62 63 64 65 66 67 68 69 70 71 72 73 74 75 76 77 78 79 80 81 82 83 84 85 86 87 88 89 90 91 92 93 94 95 96 97 98 99 100 101 102 103 104 105 106 107 108 109 110 111 |
#include <string.h> // ピン設定 | Pin assignments #define GT_DTR 4 // DTR #define GT_DSR 6 // DSR #define GT_TRDY 7 // TRDY <--未使用 | Disused const int trigPin = 8; const int echoPin = 9; // 変数設定 | Variable settings long duration; int distance; int lastImageIndex = -1; // 前回の画像インデックスを記憶する変数 | Variable to store the previous image index void setup() { // ピン初期設定 | Pin setting pinMode(GT_DTR, INPUT); pinMode(GT_DSR, OUTPUT); pinMode(GT_TRDY, INPUT); digitalWrite(GT_DSR, LOW); // 超音波センサー用ピンの入出力設定 | Set pin modes for ultrasonic sensor pinMode(trigPin, OUTPUT); pinMode(echoPin, INPUT); // シリアル通信の初期設定 | Initialize serial communication Serial.begin(38400); // 38400bps Baud rate Serial.setTimeout(100); // シリアルタイムアウト | Serial timeout delay(1000); // 初期化待ち | Wait for initialization } void loop() { // トリガーピンを一旦LOWにする | Clear the trigPin digitalWrite(trigPin, LOW); delayMicroseconds(2); // 10マイクロ秒だけHIGHにして超音波を発信 | Send a 10us pulse to trigger digitalWrite(trigPin, HIGH); delayMicroseconds(10); digitalWrite(trigPin, LOW); // エコーピンがHIGHになっている時間を計測 | Read the echoPin duration = pulseIn(echoPin, HIGH); // 音速から距離を計算 (cm) | Calculate the distance in cm distance = duration * 0.034 / 2; // 距離に応じて表示する画像のインデックス(0〜2)を決定 | Determine the index of the image to display (0 to 2) based on distance int currentImageIndex = 0; if (distance >= 25) { currentImageIndex = 0; // 遠い(25cm以上、または検知限界) | Far (25cm or more, or detection limit) } else if (distance >= 12) { currentImageIndex = 1; // 中くらい(12cmから25cm未満) | Medium (12cm to less than 25cm) } else { currentImageIndex = 2; // 近い(12cm未満) | Near (less than 12cm) } // 値が変わったときだけGT-SPにコマンドを送信して負荷を減らす | Send command to GT-SP only when the value changes to reduce load if (currentImageIndex != lastImageIndex) { // 画像オブジェクト(オブジェクトNo.0)の表示コンテンツ(0x14)を切り替え | Switch the display content (0x14) of the image object (Object No. 0) gtsp_ObjPrpSet_val(0, 0x14, 1, currentImageIndex); lastImageIndex = currentImageIndex; } delay(100); // 100ms間隔で更新 | Update every 100ms } /********************** GT-SP関数 | Function for GT-SP **********************/ //////////////////////////////////////////////////// // オブジェクト制御コマンド - プロパティ設定 (数値用) | Object Control Command - Property Setting (for Value) //////////////////////////////////////////////////// void gtsp_ObjPrpSet_val(int obj, int prp, int ln, unsigned long val) { gt_print("CMD"); // コマンドヘッダ | Command header gt_put(0xd3); // オブジェクト-プロパティ設定コマンド | Object-Property Setting gt_put(obj >> 0); // オブジェクトNo. 下位バイト | Object No. Lower byte gt_put(obj >> 8); // オブジェクトNo. 上位バイト | Object No. Upper byte gt_put(prp >> 0); // プロパティNo. 下位バイト | Property No. Lower byte gt_put(prp >> 8); // プロパティNo. 上位バイト | Property No. Upper byte gt_put(ln >> 0); // データ長 最下位バイト | Data length Least significant byte gt_put(ln >> 8); // データ長 下位バイト | Data length second byte gt_put(ln >> 16); // データ長 上位バイト | Data length third byte gt_put(ln >> 24); // データ長 最上位バイト | Data length Most significant byte if (ln >= 1) gt_put(val >> 0); if (ln >= 2) gt_put(val >> 8); if (ln >= 3) gt_put(val >> 16); if (ln >= 4) gt_put(val >> 24); } //////////////////////////////////////////////////// // 文字列送信 | Send string to GT-SP //////////////////////////////////////////////////// void gt_print(String val) { int val_i; // 文字列を1文字ずつ送信 | Send string per one byte for (val_i = 0; val_i < val.length(); val_i++) { while (digitalRead(GT_DTR) == HIGH) {} // busycheck Serial.print(val.substring(val_i, val_i + 1)); } } //////////////////////////////////////////////////// // 1byte送信 | Send byte to GT-SP //////////////////////////////////////////////////// void gt_put(unsigned char onebyte) { while (digitalRead(GT_DTR) == HIGH) {} // busycheck Serial.write(onebyte); } |
Conclusion
Once you write the program and hold your hand over the sensor, the screen graphics will switch in real-time according to the distance to the object. By incorporating such visual changes rather than simply displaying numerical values as text, you can build a user interface that is intuitive and easy for anyone to understand.
Please try registering images suited to your own applications and utilize them for your original device development.