Series: Using the GT-SP Touch Panel TFT Display with Arduino
Connecting an Arduino to a touchscreen and displaying text messages
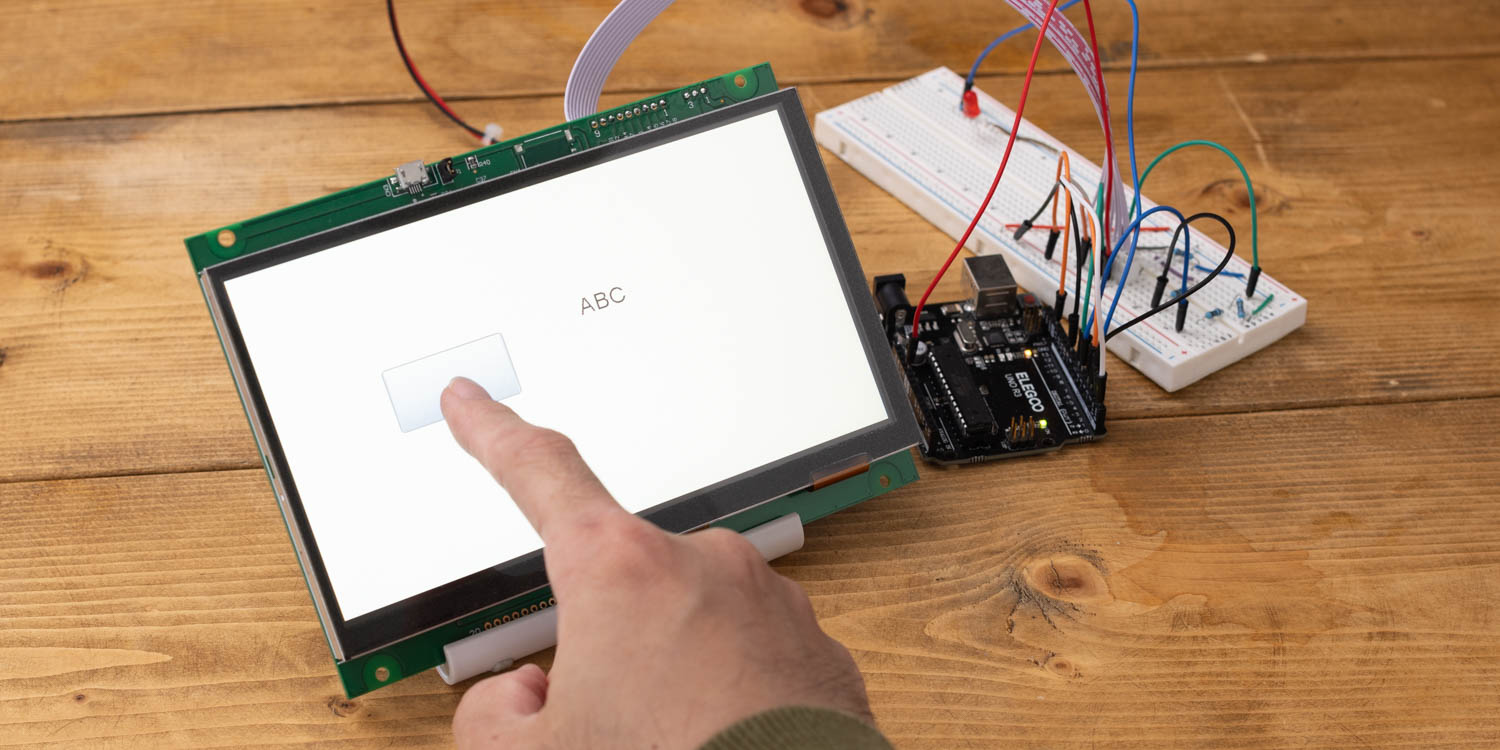
Table of Contents
DownloadDownload sample project & program (for GT Design Studio & Arduino)
Hello everyone, it’s @kissaten, someone interested in trying out electronics projects. In this series, as a beginner in electronics, I will be explaining the process of connecting a touch panel TFT/LCD display to Arduino and developing various things.
There are many touch screen products in the world, but for this series, I chose the GTWV070S3A00P, a 7-inch touch display from Noritake’s GT-SP series. It seems to be very easy to handle, even for beginners, because the display screen can be designed with a dedicated PC tool and the screen can be controlled without the need to read touch coordinates. And since it supports serial connection, only a few cables are needed to connect to Arduino.
In this article, I used this touch screen and an Arduino to get to the point where you can touch the screen and see text on the display.
Obtaining Various Documents
To start with electronic projects, obtain the necessary materials and tools from the GT-SP support page . Download the hardware specifications and software specifications for the touch screen GTWV070S3A00P, design tool GT Design Studio, and GT-SP User Guide Part 1-3. If you are dealing with GT-SP for the first time, it is recommended to go through the user guide. Some files may require membership registration, but all resources, including design tools, are available free of charge.
GTWV070S3A00P Specifications (member registration required)
Design Tools (member registration required)
User’s guide
- GT-SP user guide Part 1 (Introduction)
- GT-SP user guide Part 2 (How to Use Design Tools)
- GT-SP user guide Part 3 (Host Control Edition)
Connecting a Touch Screen to Arduino
Noritake’s TFT/LCD display GT-SP series can be connected to various major microcontrollers using a serial interface. In this case, I will be using an Arduino UNO (or compatible) as the host controller and combining it with the GT-SP for development.
Referencing User Guide Part 3, I will proceed to connect the GT-SP and Arduino UNO.
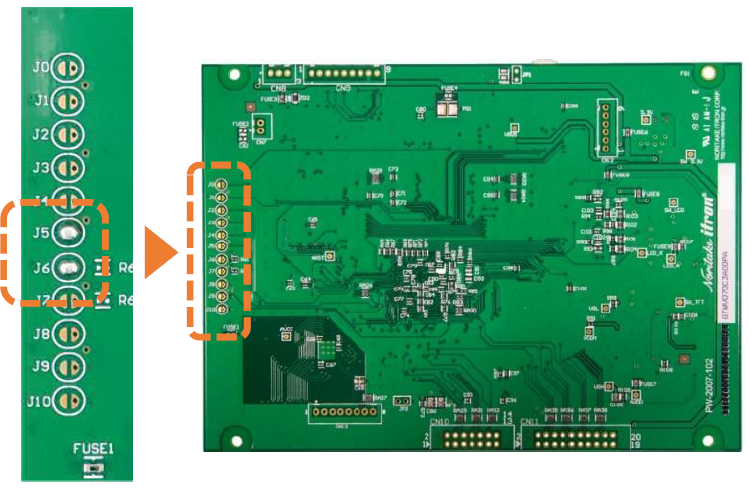
First, set the jumpers on the GT-SP to switch the interface settings. Please refer to respective GT-SP’s hardware & software specifications and set the jumpers accordingly. For GTWV070S3A00P, only solder and short circuit J5 and J6 to switch to UART (38,400 bps).
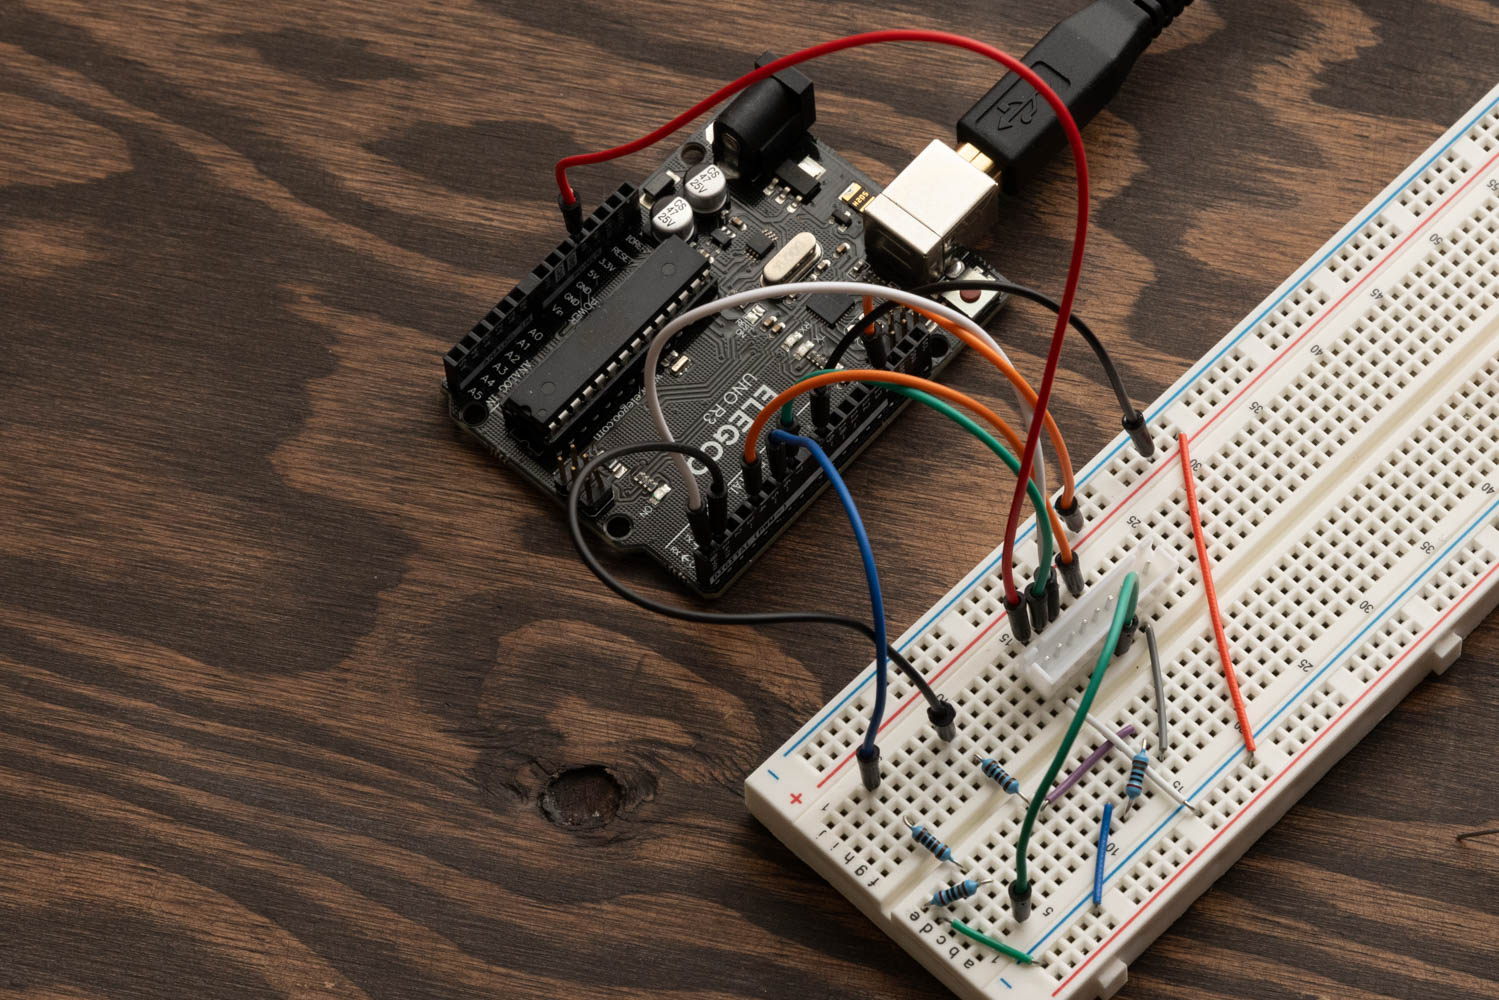
Since the wiring diagram in the User Guide is for Arduino Nano Every, it has been modified for Arduino UNO as follows.
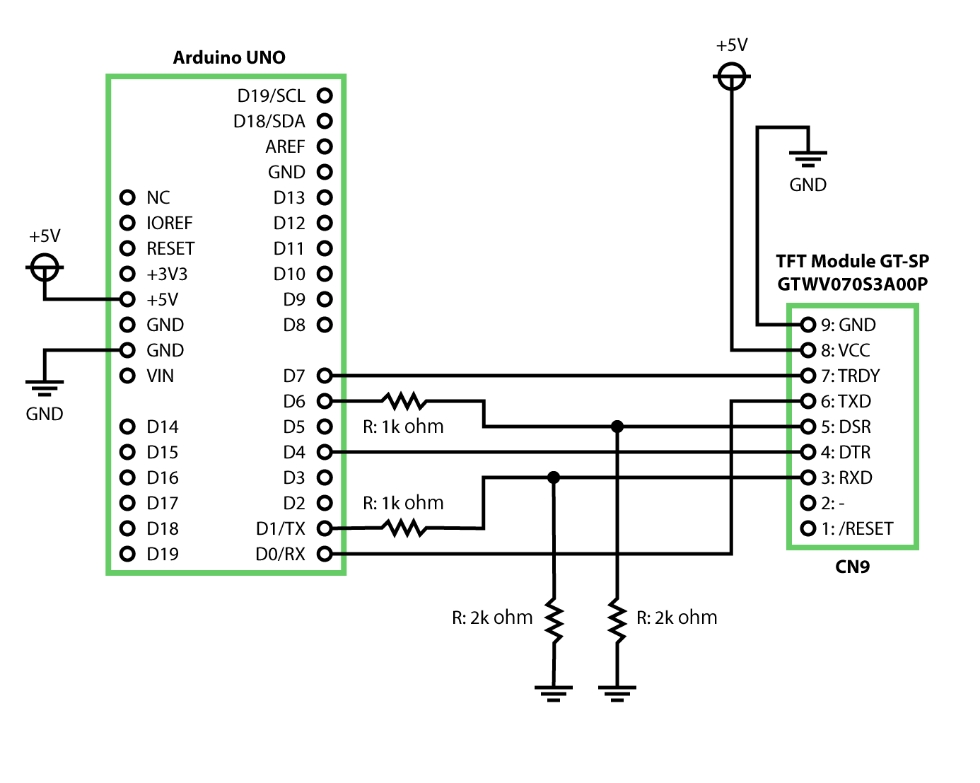
Here is an example of a connection using a breadboard.
Creating a Project to Write to the Touch Screen
Referring to “Receiving Response Data” in User Guide Part 3, create a project using GT Design Studio to output “ABC” when a button is pressed, and register it to GT-SP. The basic usage of GT Design Studio is detailed in User Guide Part 2, so it is advisable for first-time users to read that section beforehand.
Explanation:
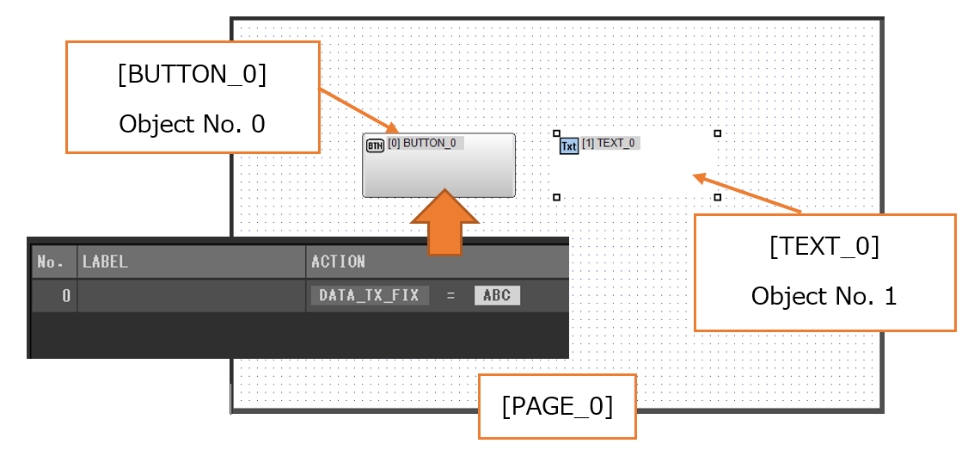
Create a button “BUTTON_0” on page “PAGE_0” and assign the event action “DATA_TX_FIX” to it. In the content, use TEXT to input “ABC.”
Also, create “TEXT_0” as a receptacle to hold the values returned from Arduino.
Creating a Program to Write to Arduino
Referencing “Receiving Response Data” in User Guide Part 3, register the following sample program on Arduino.
*Note: The sample program written in the User Guide is intended for Arduino Nano Every, and as is, it will not work with Arduino UNO. To make it compatible with UNO, the serial communication in the sample program has been changed from “Serial1” to “Serial.”
DownloadDownload sample project & program (for GT Design Studio & Arduino)
|
1 2 3 4 5 6 7 8 9 10 11 12 13 14 15 16 17 18 19 20 21 22 23 24 25 26 27 28 29 30 31 32 33 34 35 36 37 38 39 40 41 42 43 44 45 46 47 48 49 50 51 52 53 54 55 56 57 58 59 60 61 62 63 64 65 66 67 68 69 70 71 72 73 74 75 76 77 78 79 80 81 82 83 84 85 86 87 88 89 90 91 92 93 94 95 96 97 98 99 100 101 102 103 104 105 106 107 108 109 110 111 |
#include <string.h> //ピン接続 | Pin assign #define GT_DTR 4 //DTR #define GT_DSR 6 //DSR #define GT_TRDY 7 //TRDY <--未使用 | unused in this sample void setup() { //ピン初期設定 | Pin setting pinMode(GT_DTR, INPUT); pinMode(GT_DSR, OUTPUT); pinMode(GT_TRDY, INPUT); digitalWrite(GT_DSR, LOW); //Serial setting Serial.begin(38400); //38400bps Baud rate Serial.setTimeout(100); //シリアルタイムアウト | Serial timeout } //変数 | Variable String gtsp_res_data; bool screen_reflesh = false; //画面再描画フラグ | Display refresh flag //////////////////////////////////////////////////// // loop //////////////////////////////////////////////////// void loop() { //GT-SPデータ受信 | Receive one GT-SP response data if ( Serial.available() ) { gtsp_res_data = gtsp_signal_read(); screen_reflesh = true; } //画面描画 | Screen update if (screen_reflesh == true){ gtsp_ObjPrpSet_string(1, 0x40, gtsp_res_data); } screen_reflesh = false; } /********************** 関数 | Function **********************/ //////////////////////////////////////////////////// // オブジェクト制御コマンド-プロパティ設定(文字列用) | Object Control Command -Property Setting (String) //////////////////////////////////////////////////// void gtsp_ObjPrpSet_string(int obj, int prp, String val ) { gt_print("CMD"); //コマンドヘッダ | Command header gt_put(0xd3); //オブジェクト-プロパティ設定コマンド | Object-Property Setting gt_put(obj >> 0); //オブジェクトNo. 下位バイト | Object No. Lower byte gt_put(obj >> 8); //オブジェクトNo. 上位バイト| Object No. Upper byte gt_put(prp >> 0); //プロパティNo. 下位バイト | Property No. Lower byte gt_put(prp >> 8); //プロパティNo. 上位バイト| Property No. Upper byte gt_put(val.length() >> 0); //データ長 最下位バイト | Data length Least significant byte gt_put(val.length() >> 8); //データ長 下位バイト | Data length second byte gt_put(val.length() >> 16); //データ長 上位バイト | Data length third byte gt_put(val.length() >> 24); //データ長 最上位バイト| Data length Most significant byte gt_print(val); //文字列送信 } //////////////////////////////////////////////////// // 1byte送信 | Send byte to GT-SP //////////////////////////////////////////////////// void gt_put(unsigned char onebyte) { while ( digitalRead(GT_DTR) == HIGH ) {} //busycheck Serial.write(onebyte); } //////////////////////////////////////////////////// // 文字列送信 | Send String to GT-SP //////////////////////////////////////////////////// void gt_print(String val) { int val_i; //文字列を1文字ずつ送信 | Send string per one byte for (val_i = 0; val_i < val.length(); val_i++) { while ( digitalRead(GT_DTR) == HIGH ) {} //busycheck Serial.print(val.substring(val_i, val_i+1)); } } //////////////////////////////////////////////////// // データ受信(文字列用) | Receive data from GT-SP (for String) //////////////////////////////////////////////////// String gtsp_signal_read(){ byte res_dl[4] = ""; unsigned long dl; char res_data_char[255]=""; if (Serial.find("RESb", 4)){ Serial.readBytes(res_dl, 4); //データ長抽出 | Read data length dl = (unsigned long)(res_dl[0] + (res_dl[1]<<8) + (res_dl[2]<<16) + (res_dl[3]<<24)); //データ長変換 | Data length Serial.readBytes(res_data_char, dl); //データ抽出 | Read data return String(res_data_char); //String型変換、リターン | Return as String } } |
Interpreting the Program
When a button on the GT-SP is pressed, the GT-SP sends the data “ABC” to Arduino. Arduino reads this and sends an instruction to display “ABC” on the GT-SP’s text object.
To delve into the details, when the host receives serial data from GT-SP, the Serial.available() flag is raised, triggering a call to gtsp_signal_read(). It then determines if the data begins with “RESb” and retrieves the 4-byte data length. Subsequently, it retrieves the data for the specified length. As a result, the string “ABC” sent from GT-SP is returned.
Next, using gtsp_ObjPrpSet_string with the object number, property number, and the received string “ABC,” the program instructs the GT-SP’s “Text Object” to display “ABC.”
Execution Results
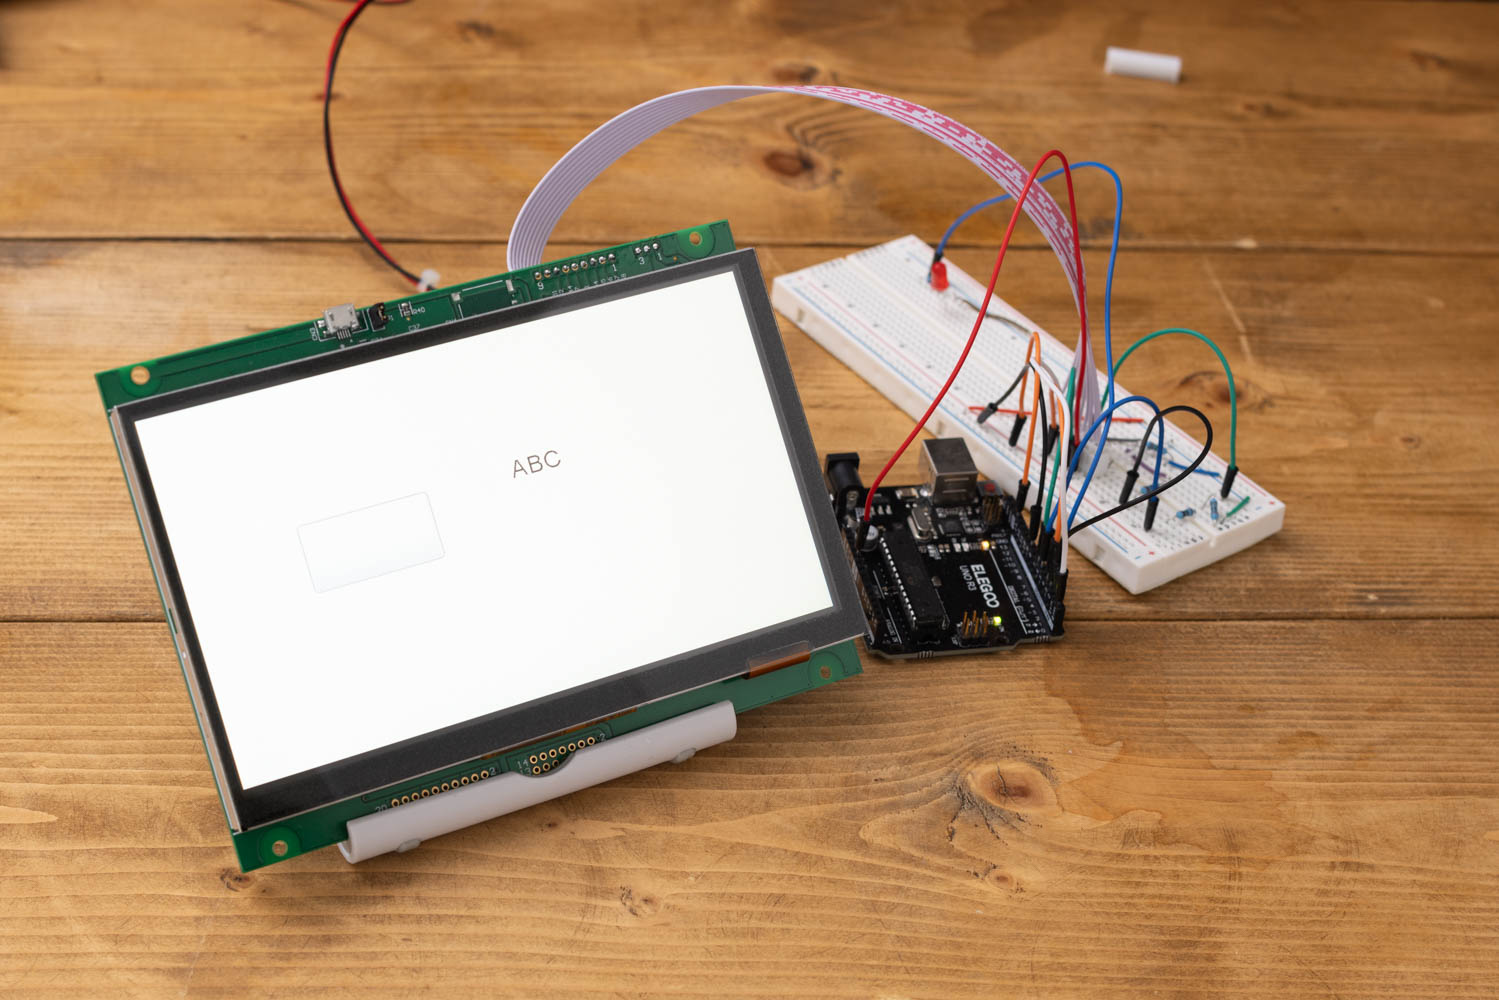
Connect the GT-SP with the programmed project and the Arduino with the uploaded sketch. When you press the button on the GT-SP, the previously empty text object section displays “ABC.”
When you press the button, you can check what kind of data is being sent through the “Terminal” in GT Design Studio or the Serial Monitor in the Arduino IDE. By observing this, it is confirmed that the data “ABC” sent from the GT-SP is processed by Arduino and re-output on the screen.
Next time, I will try controlling an LED connected to Arduino from the touch screen.